Setting Up Google Analytics 4 for eCommerce: Why Your Data Starts Here
Introduction : Most Setups Are Superficial—Here’s Why That’s a Problem
Most people set up Google Analytics like they’re assembling IKEA furniture—fast, surface-level, and just enough for it to stand. But if you’re running an eCommerce business and actually want to grow, this approach won’t cut it.
This blog is about doing it differently. More intentionally.
I’ve been working with small and medium eCommerce businesses for a while now—helping them turn their traffic, sales, and customer behavior into real insights. And every single time, it all starts in the same place: data collection. Not just any data, but data that’s been thoughtfully tracked, clearly named, and tied to the actual business model.
And that’s what this post is about. We’re going to walk through what a good Google Analytics 4 (GA4) setup looks like—especially if you're running a site on Squarespace—and how to make sure it’s capturing what you need it to capture. Because without clean data, nothing else matters.
Start with the Basics (But Do Them Right)
So, yes—step one is setting up your GA4 property. This part is straightforward:
You create a property in GA4
👉 Official guide: Set up Analytics for a website and/or appYou set up your data stream (e.g., for your Squarespace website)
👉 Create a Google Analytics 4 web data streamYou enable enhanced measurement
👉 About enhanced measurementYou check the box for eCommerce tracking if you’re running a store
👉 Set up eCommerce tracking in GA4
Google provides excellent documentation for these steps, and I won’t walk through every click here. But I will say this: take your time. Use consistent naming. Double-check your domain. Don’t just rush through it.
Because even in this early stage, small mistakes can lead to missing data later. Think of it like laying the foundation for a house—you want it to be solid before you start building floors on top.
Customizing Your Event Tracking: The Real Work Begins
This is the part most people skip. And it’s where the real power of GA4 starts to kick in.
By default, GA4 will track things like page views, scrolls, outbound clicks, and other general events. If you enable eCommerce, you’ll also get events like purchase, add_to_cart, and begin_checkout—depending on how your platform supports them.
But here’s the catch: those events aren’t customized to your business.
They won’t tell you if someone viewed your membership page. Or tried to log in. Or dropped off just before choosing a subscription plan.
That’s where custom events come in.
Step 1: Define What to Track Based on Your Customer Journey
Start by asking: What do I actually want to understand about my customers?
What are the moments that matter most in your funnel? Where do people fall off? Where do they convert? What does a "high-value" action look like on your site?
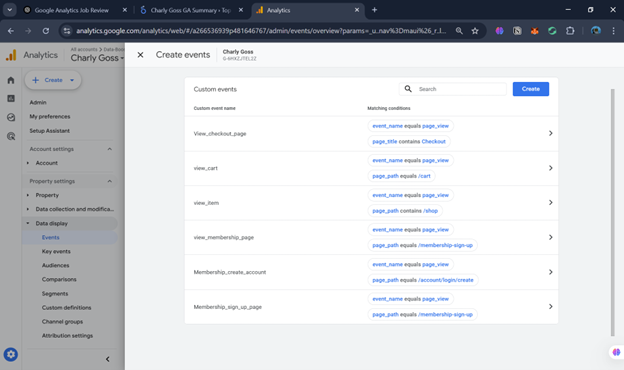
In one of the projects I worked on (a membership-based Squarespace store), we decided early on that we needed to track:
Visits to the membership section
Account creation attempts
Checkout starts
Successful purchases
Returning member logins
These interactions were essential to understanding whether our subscription model was working. But none of them were tracked by default.
So we had to build them in.
And here’s the key: This doesn’t have to be a one-time setup. You can and should iterate. Every time you add a new landing page or experiment with a funnel, ask yourself: Are we tracking what’s happening here?
Step 2: Choose How to Track Them
You’ve got two main paths:
GA4 Native Event Setup:
Inside GA4, you can create new events by combining conditions (like specific URLs or page titles). This is good for simple use cases.Google Tag Manager (GTM):
For more control, GTM is the way to go. It lets you trigger events based on button clicks, form submissions, scroll depth—you name it.
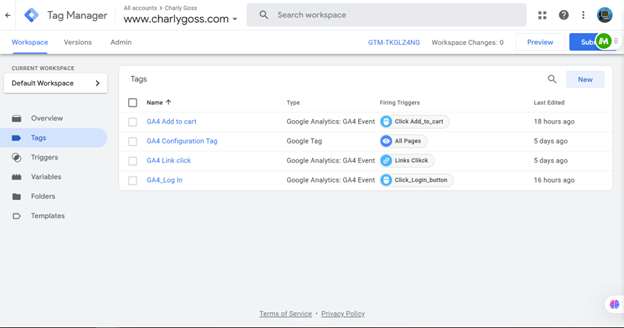
In my case, we went with GTM. It required a bit more effort up front (setting up the container, embedding the code into Squarespace), but it gave us the flexibility to track exactly what we needed.
Step 3: Create Your Events
Let’s say you want to track when someone visits your membership section. Here’s how it works in GTM:
First, create a GA4 Configuration Tag if you haven’t already—this connects GTM to your GA4 property.
Then, set up a new tag for your event (e.g.,
view_membership_section).Define a trigger—for example, a page URL that matches your membership page.
Name the event clearly (you’ll thank yourself later when reporting).
It’s best to do this one event at a time—slow and steady wins here.
Step 4: Validate Before You Move On
This is where you make sure everything is working the way you think it is.
Use GTM Preview Mode to see whether the tag is firing when the trigger condition is met.
Then go into GA4 DebugView and check that your event is showing up, with the right name and parameters.
This part is crucial. There’s nothing worse than realizing weeks later that your event never fired—or worse, fired twice.
Step 5: Iterate and Expand
Once you’ve validated your core events, you’re in a good place.
But remember—this is just the start. As your site evolves, so should your tracking. New page? New interaction? Make sure it’s being captured.
Tracking isn’t a set-it-and-forget-it task. It’s an ongoing part of optimizing your site and business.
Tips for Squarespace Users
Squarespace has its own way of doing things, and GA4 tracking can be a bit tricky.
Here’s a tip that’s worth knowing:
Missing Revenue in Your Purchase Events?
Even if you enable eCommerce tracking in GA4, you might notice that your purchase event isn’t showing the value of the transaction.
The issue? GA4 expects a currency parameter to be included. Without it, it won’t recognize the revenue.
Solution:
Manually customize the purchase event (via GTM or native event settings) to include the currency field (e.g., "currency": "USD" or "currency": "CAD" depending on your store).
It’s a small detail—but a huge deal if you want to understand revenue performance.
Conclusion: Why This Work Pays Off (and What’s Coming Next)
Doing this work takes time. It’s easy to say “I’ll come back to this later” or just trust the default settings. But if you care about understanding what’s actually happening on your site, this is the groundwork you need.
A well-set GA4 account means:
You know what’s working and what’s not
You can spot friction points in your funnel
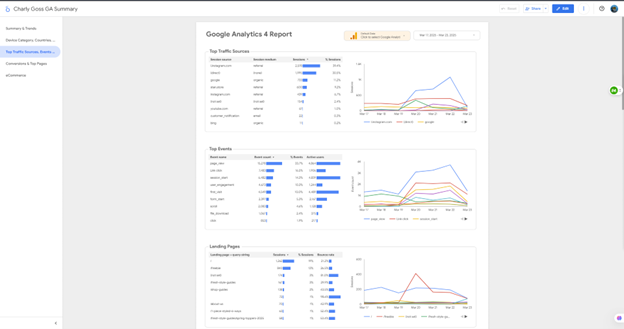
You can build custom reports with real value
You’re ready for smarter decisions down the line
In the next post, we’ll dive into those reports—how to use the events we’ve set up to actually answer business questions and spot opportunities for growth.
Until then: don’t skip the setup. Your data story starts here.